Class-Subject Overview
In this lesson, we'll explore the Class Subjects Module in SSMS.
Class Subjects is the bridge between Subjects and Classes, allowing you to define which subjects are taught in each class and assign teachers to each subject if needed.
Access Path: Academic → Class Subjects
Why Use Class Subjects?
This module is essential because it allows you to:
| Purpose | Description |
|---|---|
| Define the curriculum | Specify exactly which subjects are taught in each class |
| Assign subject teachers | Link qualified teachers to specific subjects |
| Configure different subjects | Different classes can have different subject sets |
| Control exam setup | Only assigned subjects appear in exam creation |
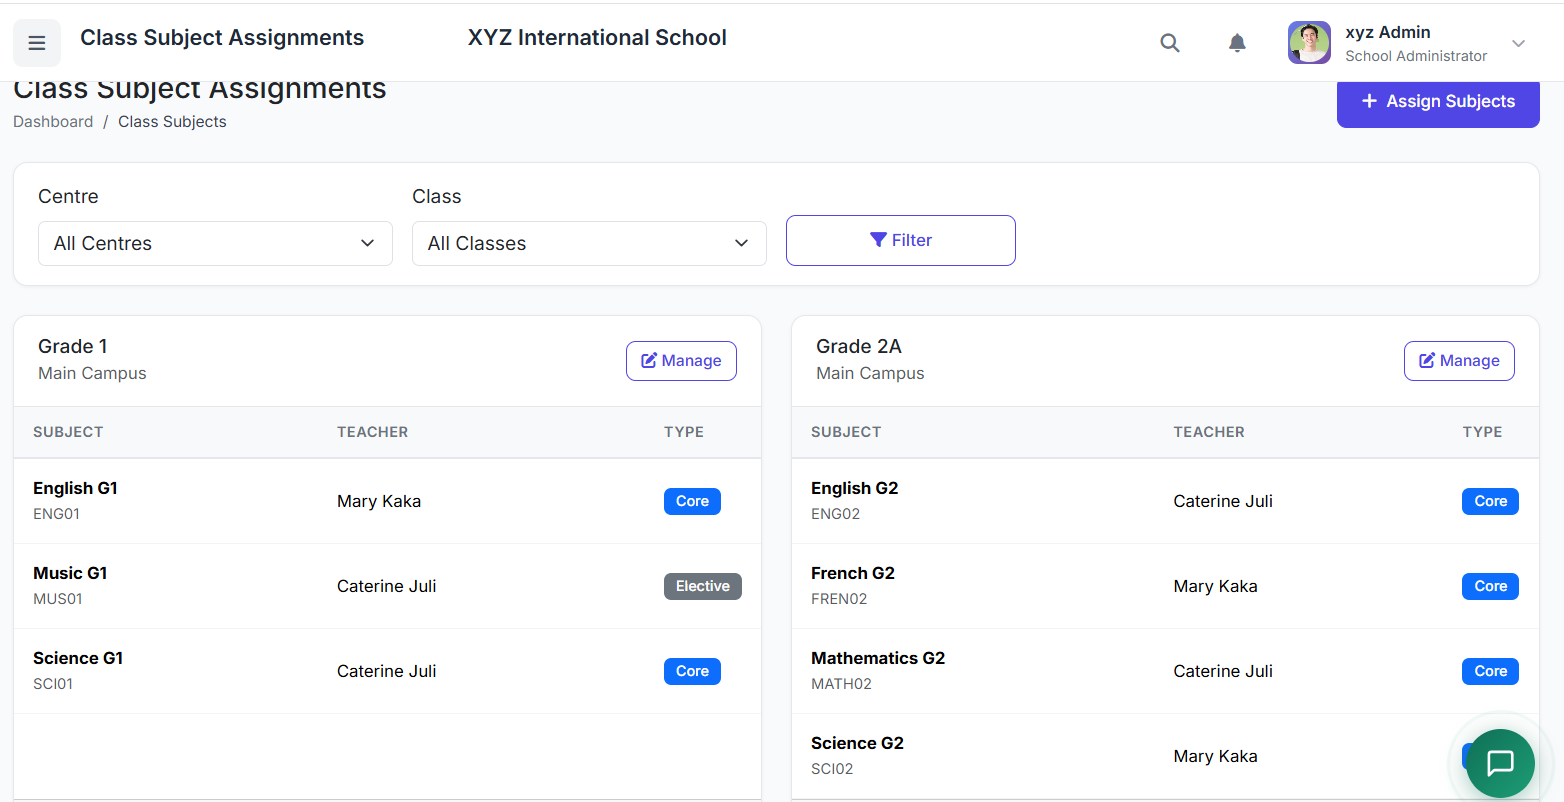
Class Subjects List Page
The page shows all class-subject assignments, including:
| Column | Description |
|---|---|
| Class Name | The class where the subject is taught |
| Subject Name | The subject being taught |
| Assigned Teacher | The teacher responsible for this subject in this class |
| Actions | Edit and Delete buttons |
Filtering Class Subjects
Use the filter dropdown at the top to:
View all class-subject assignments
Filter by a specific class
This helps you quickly find assignments for a particular class without scrolling through the entire list.
Assigning Subjects to a Class
There are two methods for assigning subjects:
Method 1: Individual Assignment
Click Add Class Subject
Fill in the details:
| Field | Description |
|---|---|
| Class | Select the class from the dropdown |
| Subject | Select the subject from the dropdown |
| Teacher (optional) | Assign a teacher to this subject |
Click Save
Best for: Adding one subject at a time or making specific adjustments.

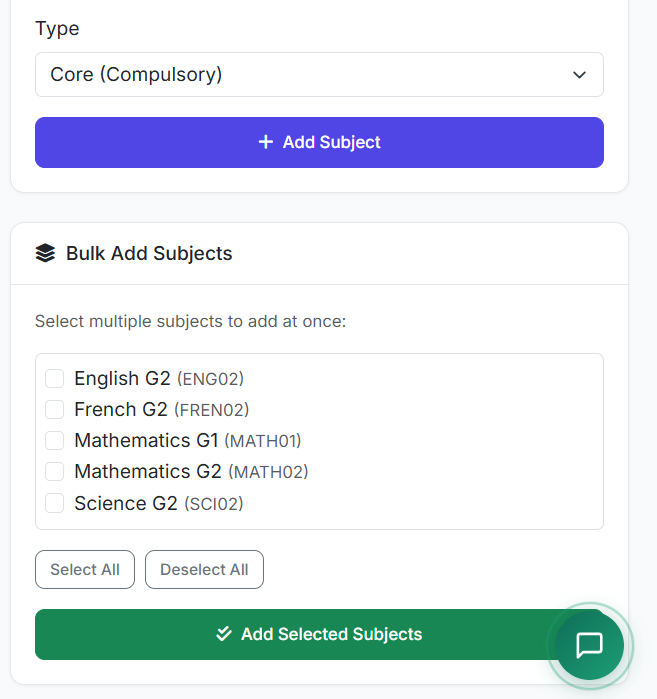
Method 2: Bulk Assignment
Click Bulk Assign
Select a Class
Check multiple Subjects from the list
Optionally assign teachers to each subject
Click Assign Selected
Best for: Setting up an entire class curriculum at once, especially at the beginning of the academic year.
Assigning Subject Teachers
A subject teacher:
Teaches the specific subject in the assigned class
Can enter grades for that subject
Appears on the timetable
To assign a teacher:
Edit the class-subject assignment
Select a teacher from the dropdown
Save changes
Note: Teacher assignment is optional. You can set up subjects first and assign teachers later.
Understanding the Relationship
Each class can have its own teachers for the same subject. Here's an example:
Class: Grade 1
| Subject | Teacher |
|---|---|
| English | Mrs. Mary Kaka |
| Science | Ms. Caterine Juli |
| Music | Ms. Caterine Juli |
Class: Grade 2A
| Subject | Teacher |
|---|---|
| Mathematics | Ms. Caterine Juli |
| English | Ms. Caterine Juli |
| Science | Mrs. Mary Kaka |
| French | Mrs. Mary Kaka |
Notice how the same teacher (Ms. Caterine Juli) can teach different subjects across different classes. This ensures flexibility across your school's academic structure.
Editing Class Subjects
Locate the assignment in the list
Click the Edit icon (pencil)
Modify the teacher or status as needed
Click Update
Removing a Subject from a Class
Find the assignment you want to remove
Click the Delete icon (trash)
Confirm removal
Important: This does not delete the subject itself. It only removes the subject from that specific class. The subject remains available for other classes.
Best Practices
| Practice | Why It Matters |
|---|---|
| Set up class subjects at the beginning of the academic year | Ensures teachers and students have clear curriculum expectations from day one |
| Assign teachers before creating timetables | Prevents scheduling conflicts and missing teacher assignments |
| Use bulk assignment for faster setup | Saves significant time when configuring multiple classes |
| Update assignments when staff changes | Keeps records accurate for grading and reporting |
| Keep subjects consistent across all sections of a class | Maintains fairness and standardisation (e.g., Grade 2A and Grade 2B should have the same subjects) |
Workflow Example: Setting Up a New Academic Year
Here's a typical workflow for using the Class Subjects module:
Step 1: Create all subjects (Subjects Module)
              ↓
Step 2: Assign subjects to each class (Class Subjects Module)
              ↓
Step 3: Assign teachers to subjects (Class Subjects Module)
              ↓
Step 4: Create timetables (Timetable Module)
              ↓
Step 5: Set up exams (Exam Module)
Troubleshooting
| Problem | Likely Cause | Solution |
|---|---|---|
| Subject not showing in exam setup | Subject not assigned to the class | Add the subject via Class Subjects first |
| Teacher cannot enter grades | Teacher not assigned to the subject | Edit assignment and assign the teacher |
| Bulk assign button does nothing | No class selected | Select a class from the dropdown first |
| Duplicate assignments | Same subject assigned twice to same class | Delete the duplicate entry |
| Subject missing from dropdown | Subject status is Inactive | Go to Subjects module and set status to Active |
Key Takeaways
| Concept | Summary |
|---|---|
| Purpose | Bridge between Subjects and Classes |
| Individual Assignment | Add one subject at a time |
| Bulk Assignment | Add multiple subjects to a class at once |
| Teacher Assignment | Optional but recommended for grading and timetables |
| Deletion | Removes the assignment, not the subject |
Closing
That's how Class Subjects are managed in SSMS.
By using this module effectively, you can:
Build a clear curriculum for every class
Ensure teachers are properly assigned
Streamline exam setup and grading
Maintain flexibility across your academic structure