Introduction
Welcome
back. In this tutorial, I’ll guide
you through the Centres Management module in SSMS.
This
module is designed for schools with multiple branches or centres,
allowing each location to be managed independently while maintaining
centralized control.
🧭 Accessing the Centres Module
To access
the Centres module:
- Click on Centres from
the main sidebar
- Then select Centres
This will take you to the centres management page.
🏫 What is a Centre?
In SSMS,
a Centre represents a physical school location or branch, such as
a main campus or satellite branch.
Using
centres allows schools to:
- Manage multiple campuses
from one system
- Keep student and staff data
organized by location
- Assign users to specific
centres
- Generate reports per centre
or across all centres
This structure is ideal for growing schools and school groups. Meanwhile, this task can only be performed by the school admin.

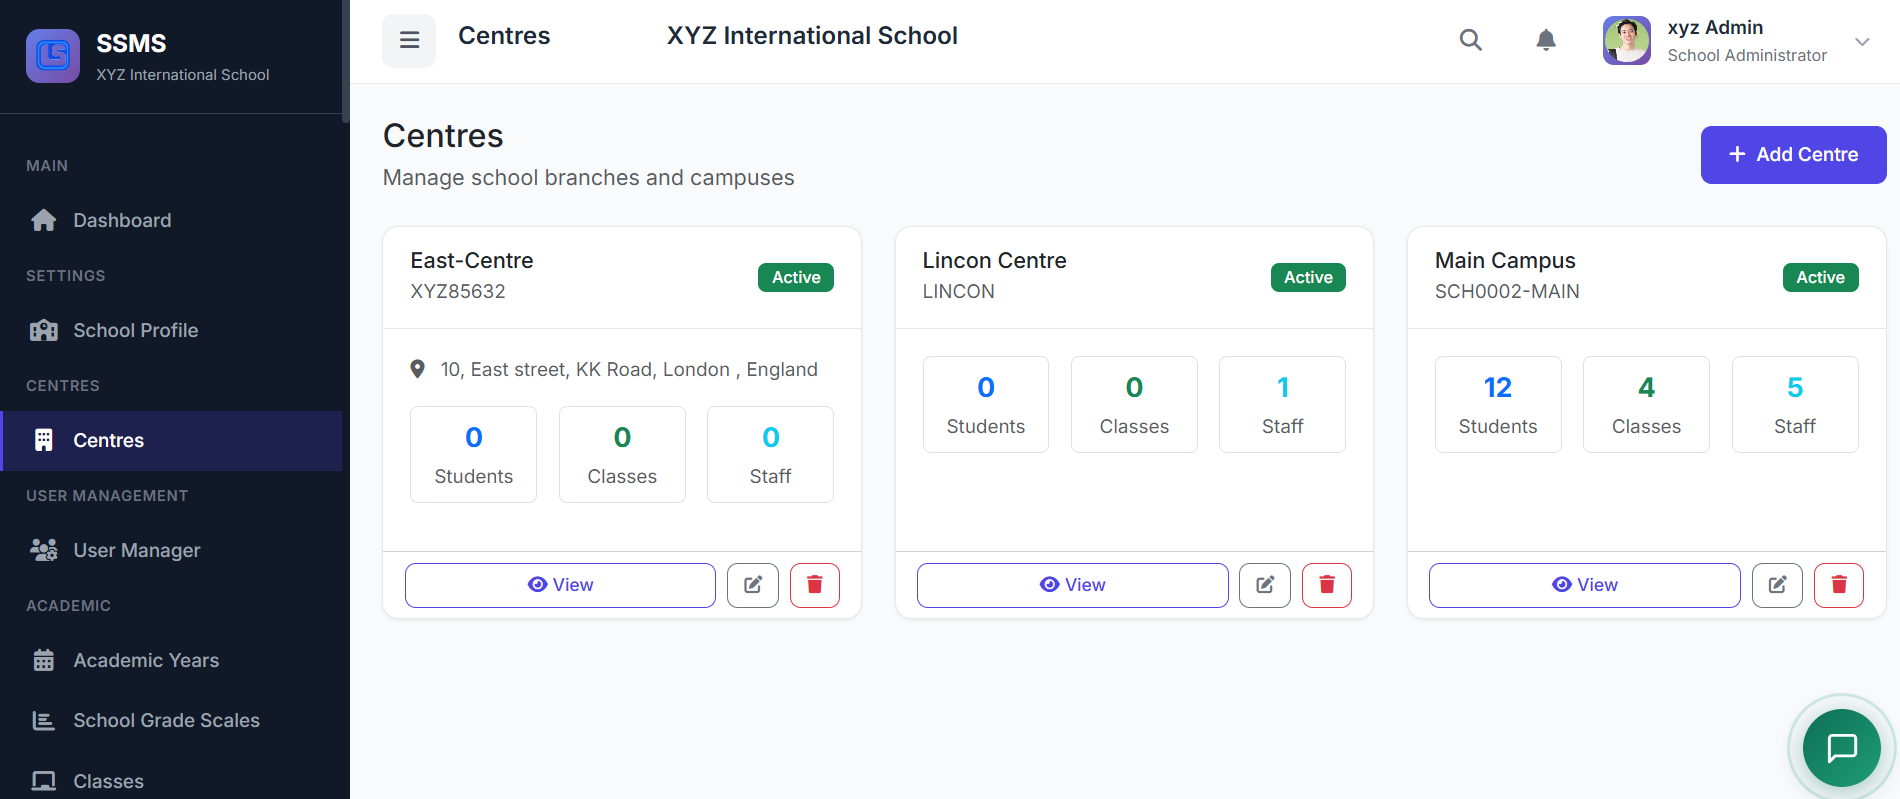
📋 Centres List Page
When the
Centres page loads, you’ll see a list of all configured centres
displayed in a table.
Each row
shows:
- Centre Name
- Centre Code, which uniquely identifies
the centre
- Address and Contact
Information
- Status, showing whether the centre
is active or inactive
- Action buttons to view, edit, or delete a centre
➕ Adding A New Centre
To create
a new centre, click the Add Centre button located at the top-right
corner of the page.
In the
form:
- Enter the Centre Name,
such as Main Campus or North Branch
- Provide a unique Centre
Code
- Fill in the physical Address
- Optionally add a Phone
Number and Email Address
- Set the Status to
Active or Inactive
Once
completed, click Create Centre to save.

✏️ Editing an Existing Centre
To edit a
centre:
- Locate the centre in the
list
- Click the Edit icon
in the Actions column
You can
update the centre’s details as needed.
After making changes, click Update Centre to save.

🗑️ Deleting A Centre
Deleting
a centre should be done with caution.
Before
deleting:
- Ensure there are no
active students or staff assigned to the centre
To
delete:
- Click the Delete icon
- Confirm the action in the popup
dialog
Please
note that this action cannot be undone and may affect associated data.
🔄 Centre Status Explanation
Each
centre can be set to one of two statuses:
- Active, meaning the centre is
fully operational and available for assignments
- Inactive, meaning the centre is
disabled and hidden from most selections, while its data remains preserved
This allows you to temporarily disable centres without losing data.
✅ Best Practices
To get
the best out of Centres Management:
- Always create centres before
adding students or staff
- Use clear and descriptive
centre names
- Maintain consistent centre
code formats
- Keep at least one centre
active at all times
These
practices help maintain clean data and smooth operations.
That’s an overview of how to manage centres in SSMS.
In the next tutorial, we’ll explore how to assign staff and students to centres and manage centre-specific operations.